


Installazione del quadro strumenti digitale VW Touareg 7L 2003–2010: 37 Passaggi con foto reali
Installazione del quadro strumenti digitale VW Touareg 7L 2003–2010: 37 Passaggi con foto reali
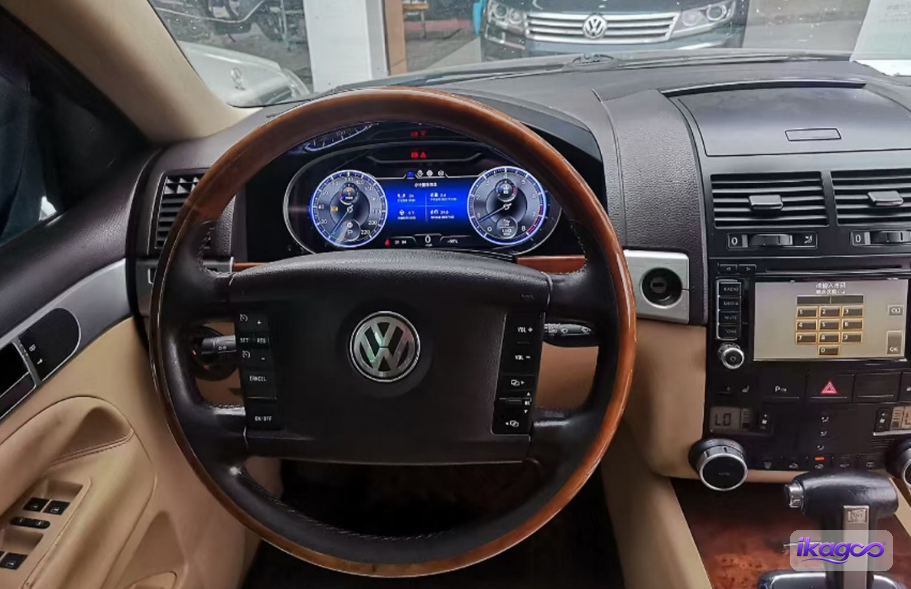
VW Touareg 7L installazione del quadro strumenti digitale per Modelli 2003–2010 È documentato qui dalla sequenza fotografica reale dell'installazione di iKAGOO. La guida segue l'ordine delle foto, dalla rimozione del rivestimento del cruscotto e dal montaggio del quadro strumenti fino al mantenimento della scheda madre originale, all'instradamento nel vano portaoggetti lato passeggero e ai controlli finali.
Il punto tecnico più importante di questo percorso è visibile nelle foto stesse: la scheda madre originale dello strumento viene mantenuta, montata su un supporto e ricollegata nell'area del vano portaoggetti lato passeggero.
Si rimuovono la cornice del quadro strumenti originale e le staffe, si collega e si monta il nuovo quadro strumenti LCD, si instrada il cavo di prolunga verso il lato passeggero, si mantiene la scheda madre originale dello strumento, si ricollega quella scheda nell'area del vano portaoggetti, quindi si testano i dati del veicolo supportati e le funzioni di avviso prima di richiudere il cruscotto.
Su quali prove si basa questa guida all'installazione del quadro strumenti digitale VW Touareg 7L?
Risposta diretta: Questa guida si basa sulla sequenza di installazione reale del Touareg iKAGOO: una copertura più 36 foto dei passaggi, con l'ordine originale a 37 passaggi preservato. Le immagini documentano direttamente la rimozione di finiture e staffe, il montaggio del nuovo cluster, l'instradamento del cavo di prolunga, il mantenimento della scheda madre originale e il posizionamento del vano portaguanti.
La stessa evidenza definisce anche i limiti dell'articolo. L'ambito di prodotto supportato è VW Touareg 7L 2003–2010, ma le foto non dimostrano che ogni veicolo in quell'intervallo di anni abbia una configurazione interna identica, e non mostrano una procedura di codifica, quindi nessuno dei due punti è presentato come un fatto universale.
VW / Volkswagen Touareg 7L, anni modello 2003–2010. La compatibilità esatta richiede comunque che la configurazione originale del quadro strumenti e del cruscotto corrisponda al percorso fornito.
Sequenza sorgente di 37 passaggi dal materiale di installazione reale iKAGOO, con ogni foto brandizzata caricata mantenuta in corrispondenza del passaggio originale.
L'articolo spiega come il lavoro sul quadro strumenti lato conducente si collega al successivo spostamento della scheda originale, invece di trattare ogni foto come una didascalia isolata.
La compatibilità è confermata dal quadro strumenti originale, dall'apertura del cruscotto, dalla piattaforma/configurazione e dai dettagli LHD/RHD, non solo dall'anno.
Come si rimuove la cornice del quadro strumenti su un VW Touareg 7L 2003–2010?
Risposta diretta: rimuovere prima la rifinitura nella zona del volante, poi le rifiniture laterali e superiori, quindi le viti esposte e le due staffe di montaggio del quadro strumenti. Il passaggio 13 è il punto in cui confrontare l'apertura del cruscotto esposta con la sequenza fotografica iKAGOO prima di collegare il nuovo quadro strumenti.
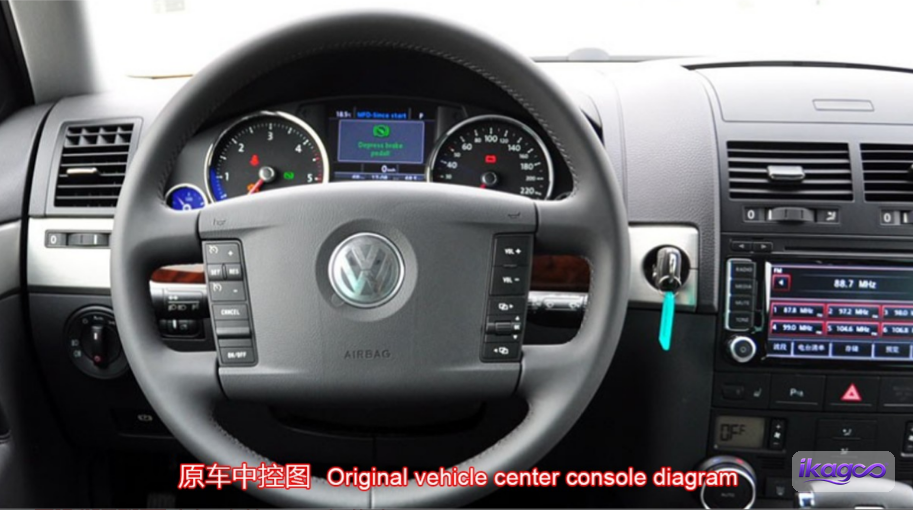
Registra il cruscotto originale prima dello smontaggio
Inizia con l'auto esattamente come è arrivata. La prima foto è il riferimento per la posizione originale del quadro strumenti, la rifinitura circostante e l'adattamento generale del cruscotto. Scatta anche tu una foto a questo punto; ti dà qualcosa di concreto da confrontare quando il nuovo quadro strumenti e la rifinitura saranno rimessi al loro posto.
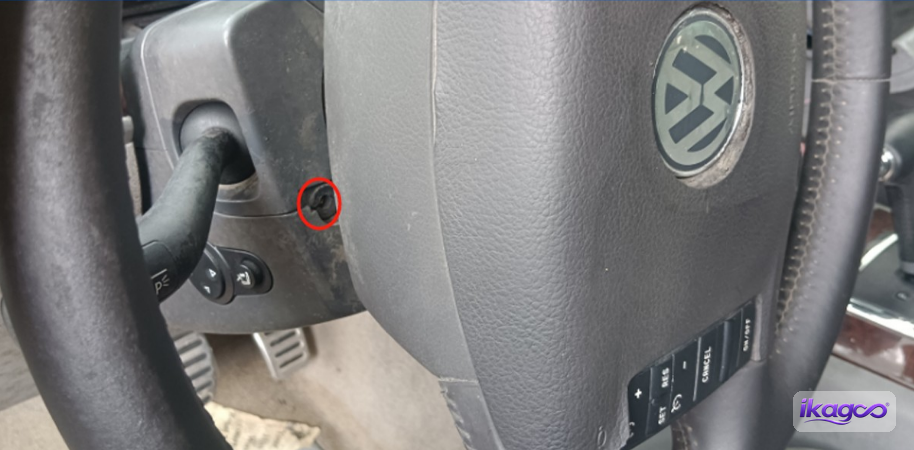
Rimuovere la vite nell'area del volante
Rimuovere la vite mostrata intorno all'area del volante. Questo è il primo punto di fissaggio nella sequenza fotografata e apre la strada alla rifinitura che viene rimossa successivamente.
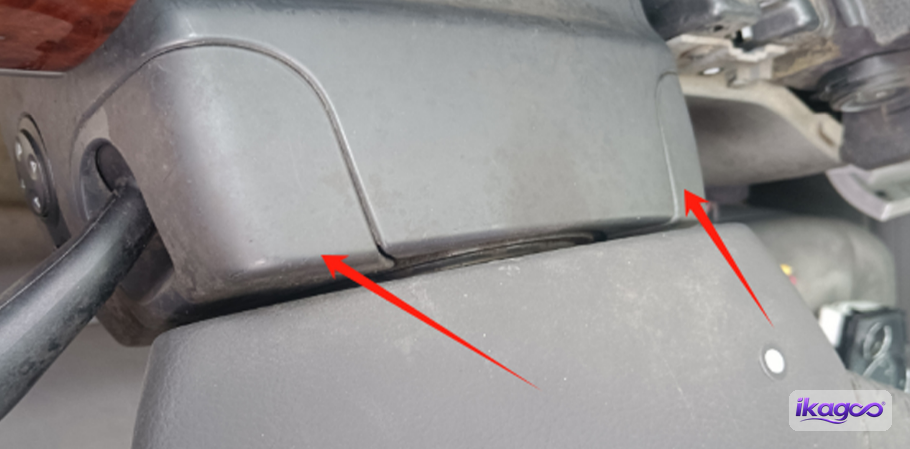
Rilasciare il pezzo di rifinitura del volante
Dopo aver rimosso la vite, rilasciare delicatamente il pezzo di rifinitura mostrato intorno all'area del volante. Lavorare dalla giunzione visibile e liberare il pezzo progressivamente invece di cercare di staccare l'intera sezione in un'unica mossa.
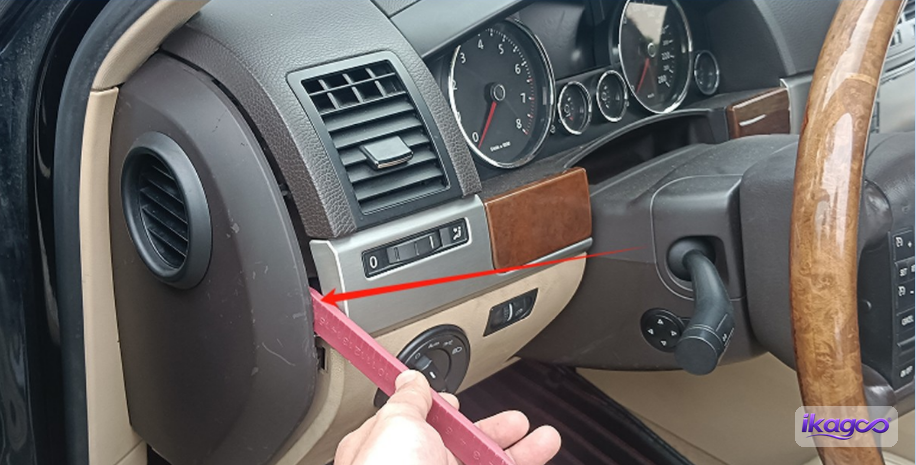
Apri il rivestimento laterale accanto al quadro strumenti
Spostati sul lato dell'area degli strumenti e rilascia il rivestimento laterale mostrato nella foto. Questo inizia a separare i rivestimenti che bloccano la cornice del quadro strumenti nel cruscotto.
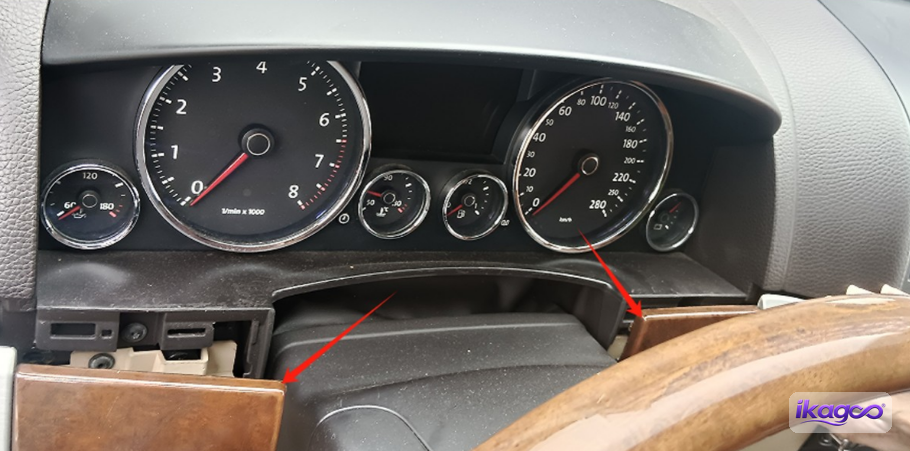
Rilascia il rivestimento su entrambi i lati
Procedi su entrambi i lati della cornice del quadro strumenti. Una volta che i pezzi laterali sono allentati, il rivestimento superiore può essere rimosso senza dover fare forza su pannelli ancora agganciati tra loro.
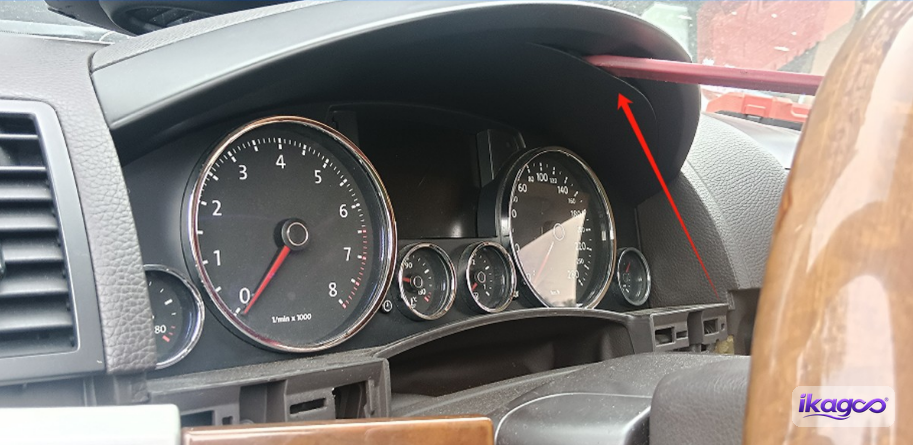
Solleva il rivestimento decorativo superiore
Rilascia il pezzo decorativo superiore sopra il quadro strumenti. La rimozione di questo pannello espone i successivi punti di fissaggio nella sequenza di installazione.
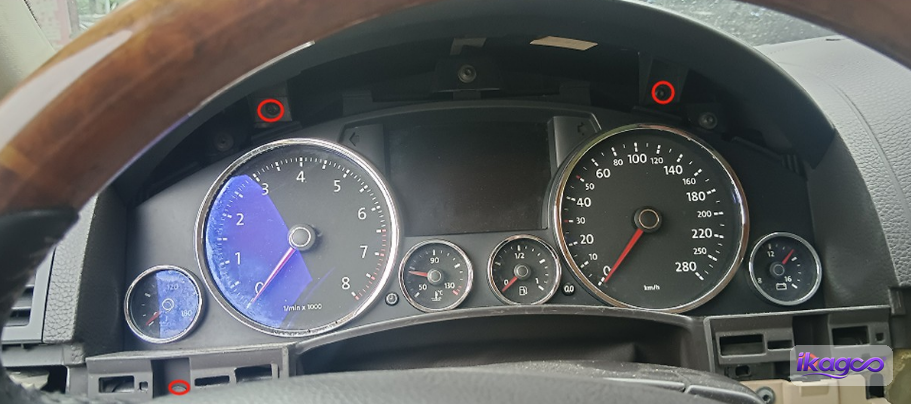
Rimuovere le viti esposte
Con il rivestimento superiore rimosso, rimuovere le viti ora visibili. Questi fissaggi tengono la struttura circostante che deve essere rimossa prima di poter raggiungere le staffe di montaggio del quadro strumenti.
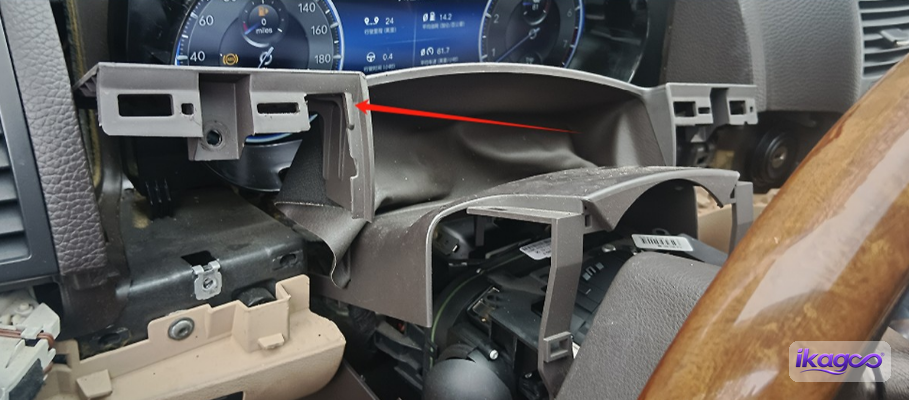
Rilasciare il rivestimento laterale rimanente
La foto successiva torna al rivestimento laterale. Rilasciare i pezzi rimanenti su entrambi i lati e tenere supportato il rivestimento mentre si stacca dal cruscotto.
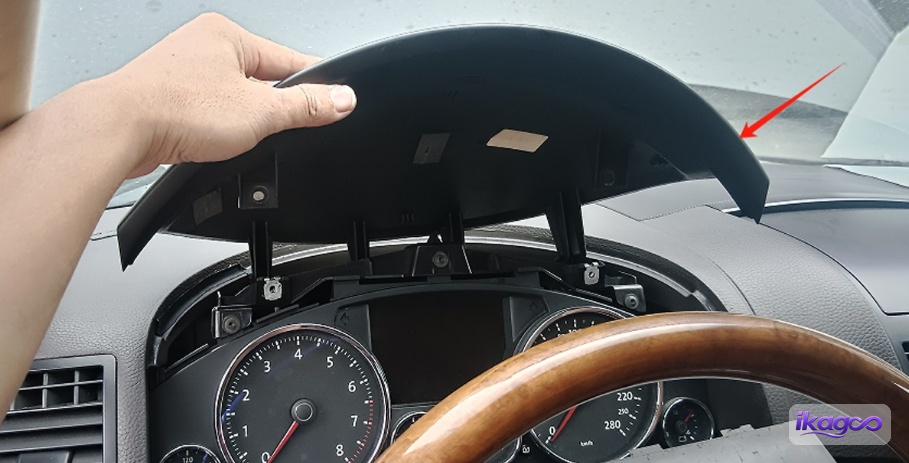
Rimuovere la sezione superiore del rivestimento attorno all'area degli strumenti
Ora rimuovere la sezione superiore del rivestimento rimanente mostrata nella foto. A questo punto la struttura di montaggio del quadro strumenti inizia a diventare completamente visibile.
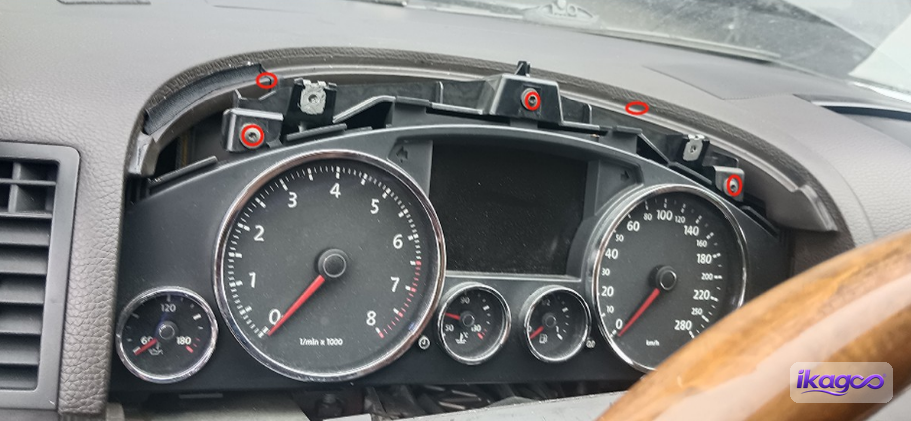
Rimuovere le viti della staffa di montaggio del quadro strumenti
Rimuovere le viti che fissano la staffa di montaggio del quadro strumenti. Questo è il punto in cui il lavoro passa dalla rimozione del rivestimento decorativo alla rimozione della struttura che posiziona fisicamente il quadro strumenti.
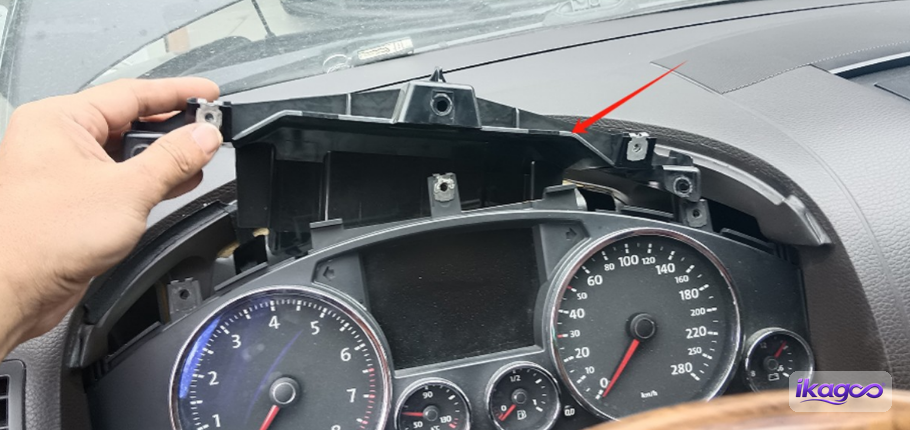
Sollevare la prima staffa di montaggio
Con le viti rimosse, estrarre la prima staffa mostrata nella sequenza. Tenerla insieme ai suoi elementi di fissaggio perché fa parte del riferimento di montaggio originale.
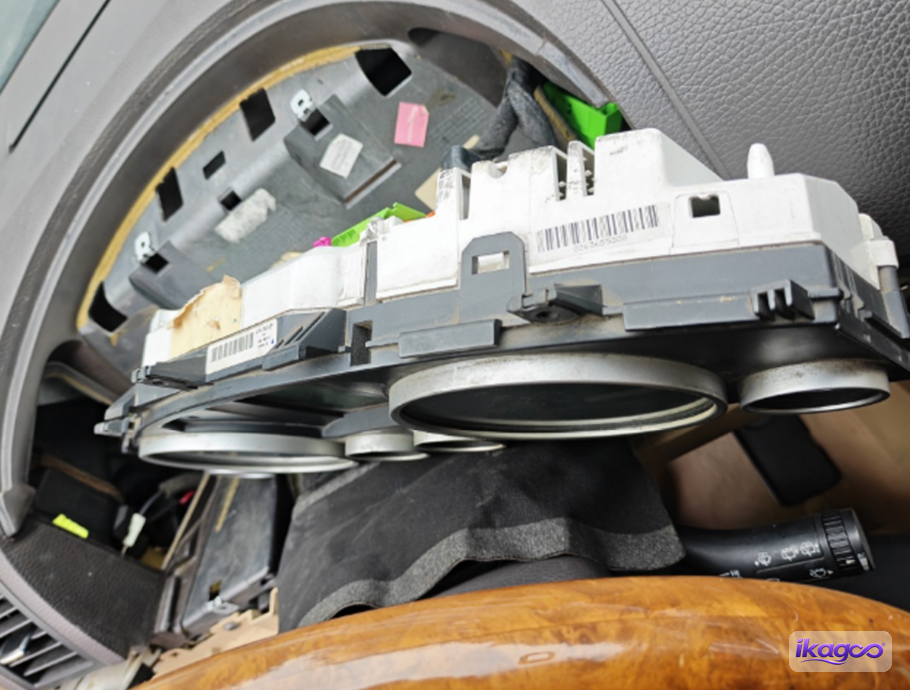
Rimuovere la seconda staffa
Rimuovere la seconda staffa nella stessa area. Una volta che entrambi i pezzi della staffa sono fuori, l'apertura del cruscotto è abbastanza libera per confrontarla con il percorso del nuovo quadro strumenti.
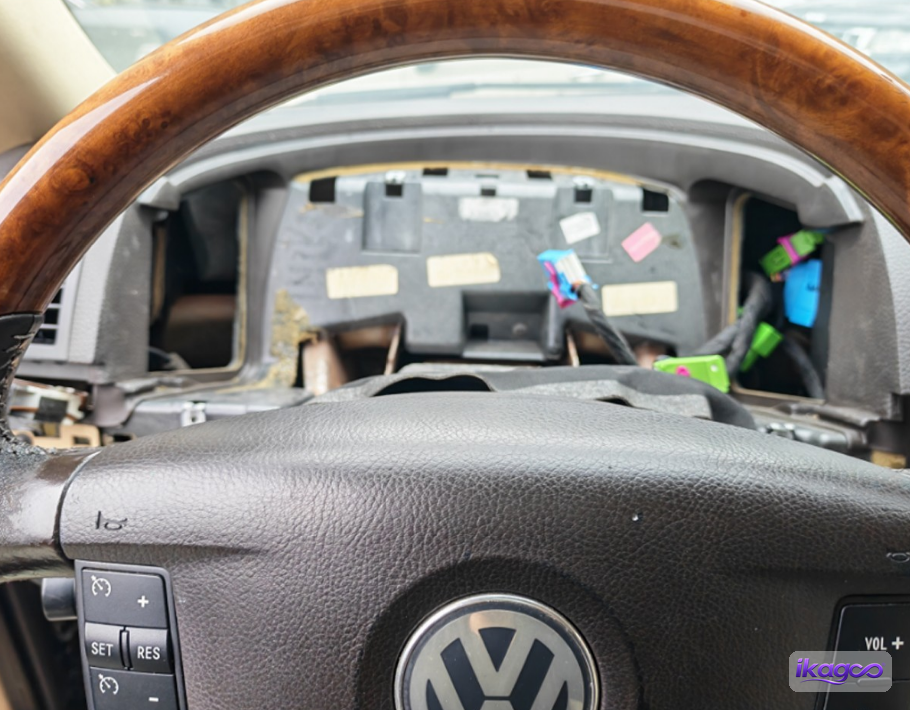
Confrontare l'apertura esposta prima di collegare il nuovo quadro strumenti
Fermarsi qui e confrontare l'apertura del proprio cruscotto con la foto. Questo è il momento più utile per individuare un'eventuale discrepanza di montaggio prima che qualsiasi nuovo componente venga collegato o inserito in posizione.
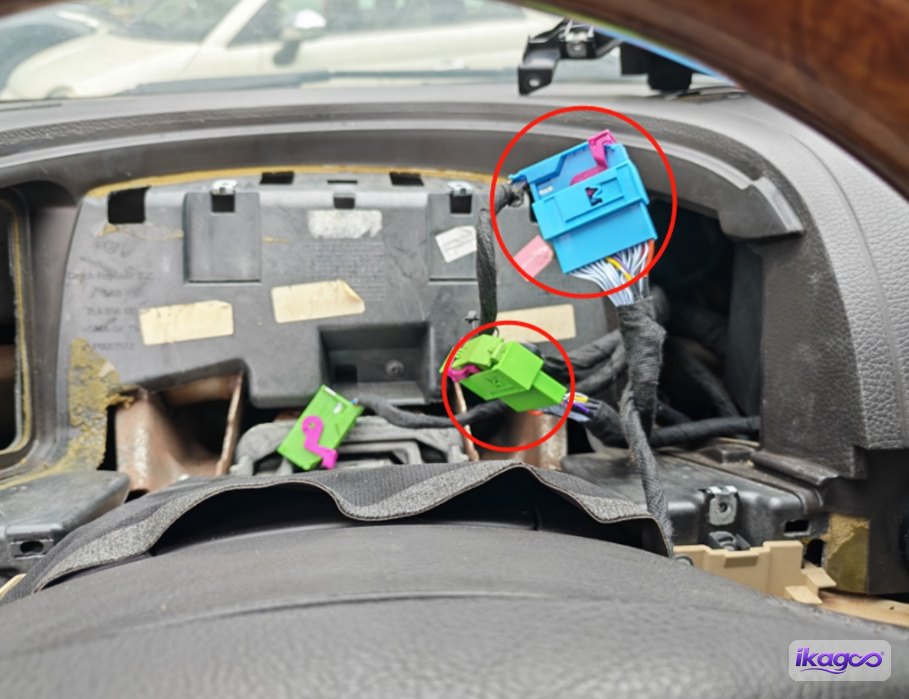
Come viene collegato il quadro strumenti digitale iKAGOO in un VW Touareg 7L 2003–2010?
Risposta diretta: collegare la spina di alimentazione principale e la spina sottile del quadro strumenti, allineare entrambi i piedini di montaggio inferiori con i perni filettati originali, posizionare il quadro nell'apertura, far passare il cavo di prolunga verso il vano portaoggetti, quindi fissare il quadro e rimontare il rivestimento. La corrispondenza dei connettori e il percorso dei cavi devono essere verificati prima di chiudere l'unità.
Collegare il cavo di alimentazione principale
Collegare il cavo di alimentazione principale al nuovo quadro strumenti LCD come mostrato. Il connettore deve corrispondere alla presa fornita e inserirsi nell'orientamento previsto.
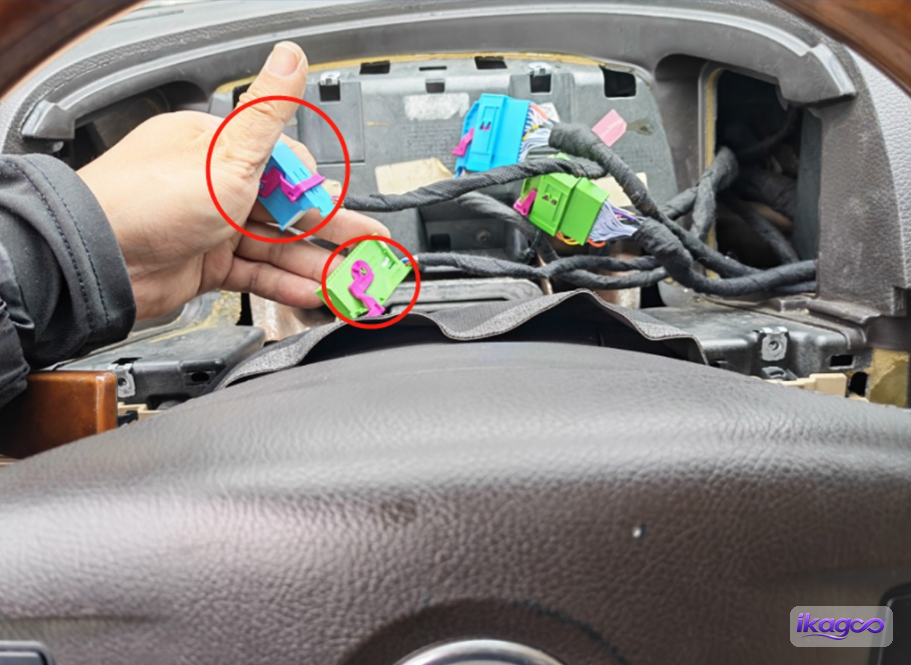
Collegare la spina sottile al quadro strumenti LCD
Inserire la spina a fili sottili mostrata nella foto nella presa corrispondente sul cluster LCD. Assicurarsi che sia completamente inserita prima di spostare il cluster verso l'apertura del cruscotto.
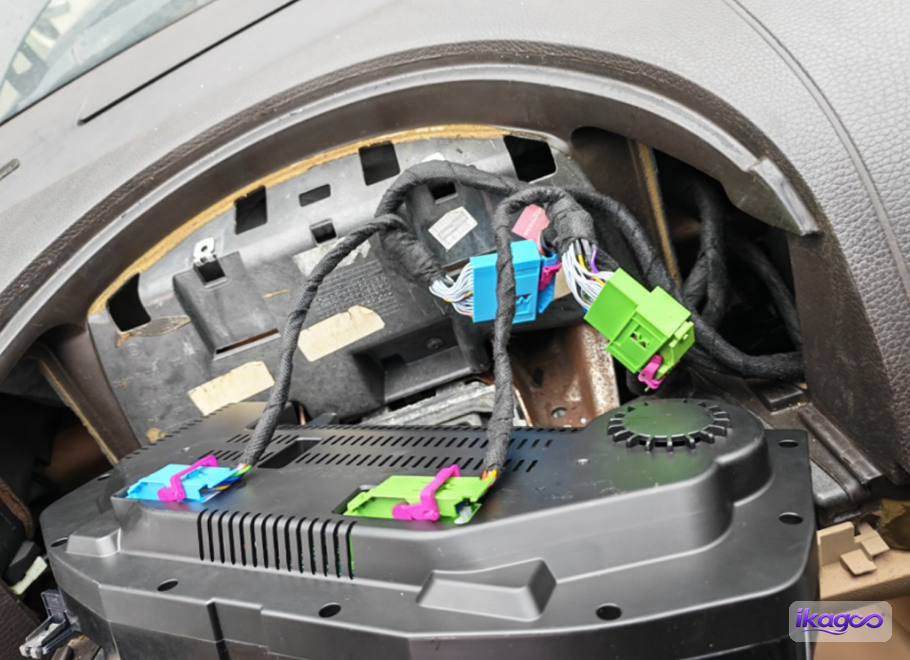
Controllare entrambe le connessioni del cluster prima del montaggio
Prima che il display venga inserito nel cruscotto, osservare le connessioni completate mostrate nella foto. Questa è l'ultima occasione facile per correggere una spina non completamente inserita prima che la parte posteriore del cluster diventi difficile da vedere.
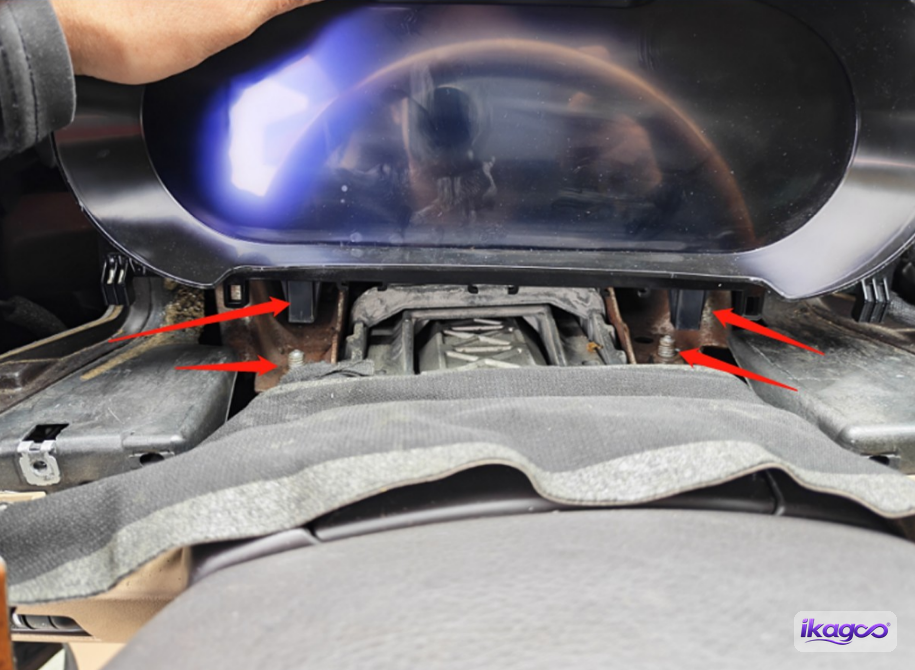
Allineare i due piedini inferiori con i perni delle viti originali
Allineare i due piedini di montaggio inferiori del nuovo cluster LCD con i perni delle viti originali mostrati nella foto. Entrambi i lati devono corrispondere ai punti di montaggio di fabbrica prima di serrare qualsiasi vite.
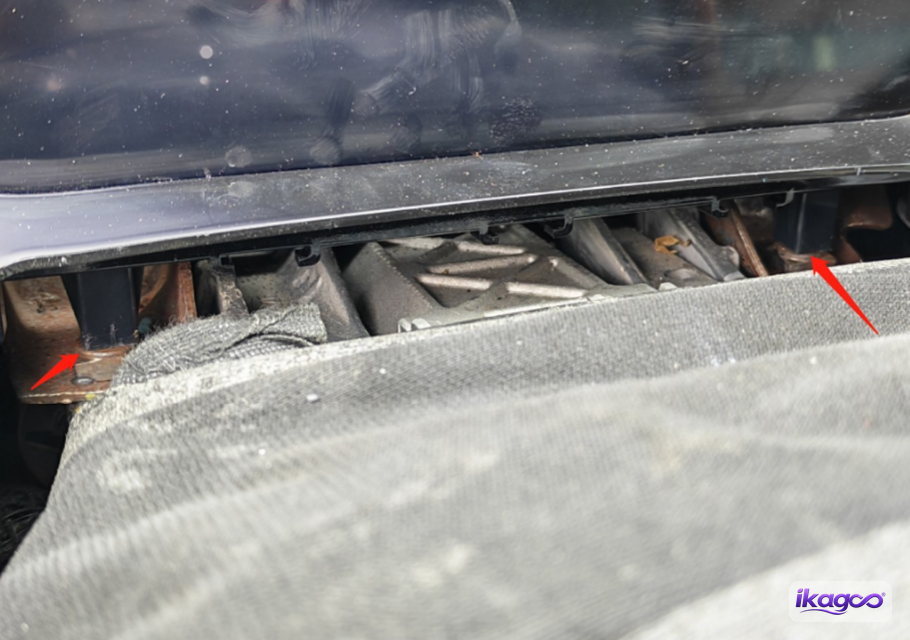
Conferma che il cluster sia posizionato in squadra
Mantieni il cluster nella posizione allineata e controlla lo spazio attorno alla scocca. L'unità dovrebbe inserirsi naturalmente nell'apertura, senza essere forzata in posizione dalle viti.
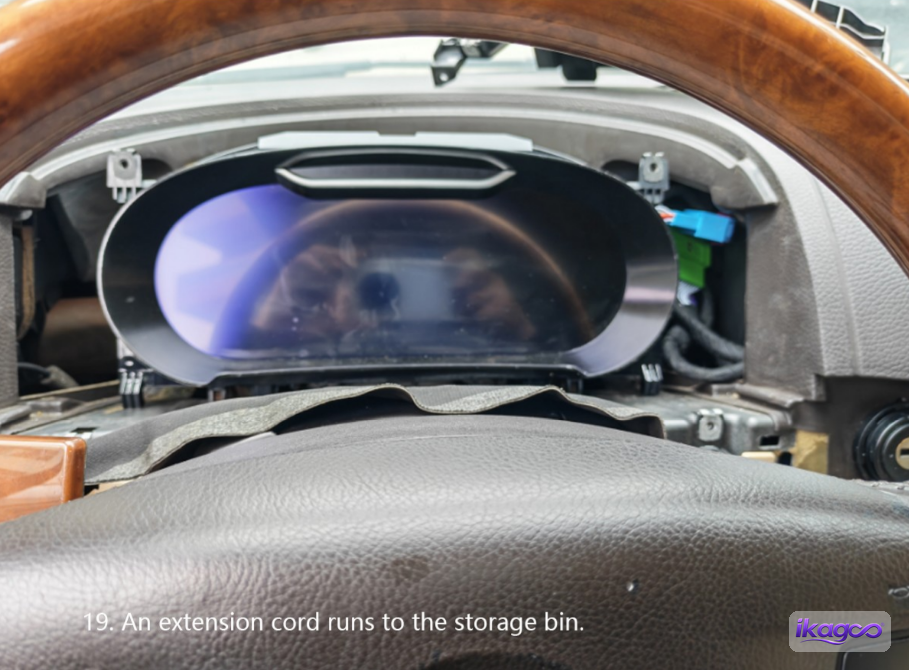
Posiziona il cluster LCD
Sposta il cluster nella sua posizione finale sul cruscotto. Mantieni i cavi dietro l'unità liberi mentre la scocca si muove verso l'interno, così che l'adattamento frontale non sia ottenuto a scapito di un cavo intrappolato dietro.
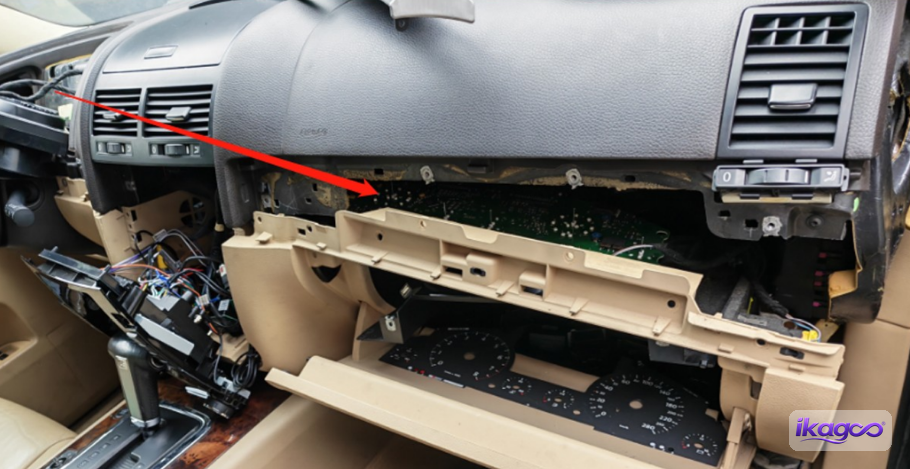
Instrada il cavo di prolunga verso il vano portaoggetti del passeggero
La sequenza della fonte introduce ora il cavo di prolunga che va dall'area del cluster verso il vano portaoggetti del lato passeggero. Instradalo lungo il percorso documentato e lascia abbastanza lunghezza per la scheda madre originale conservata, che verrà collegata successivamente.
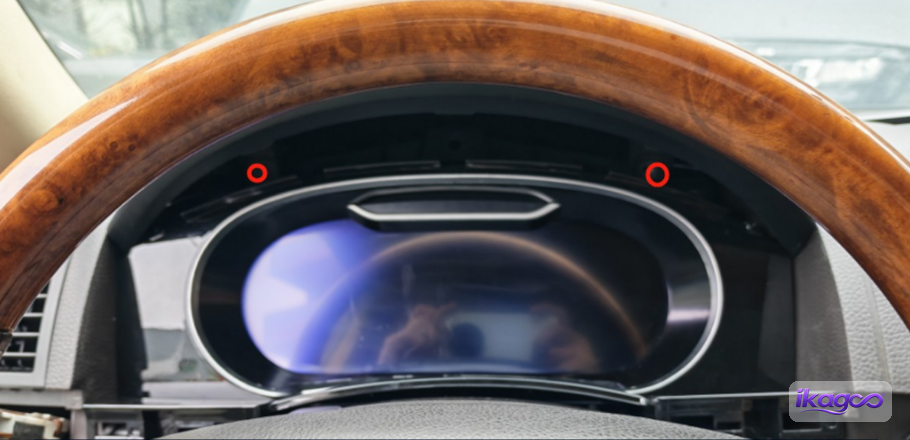
Fissare il nuovo quadro strumenti
Una volta allineato il quadro strumenti e che il cavo di prolunga abbia un percorso libero, installare le viti di montaggio. Serrare l'unità nella posizione in cui già si trova correttamente, piuttosto che usare le viti per portare l'alloggiamento in allineamento.
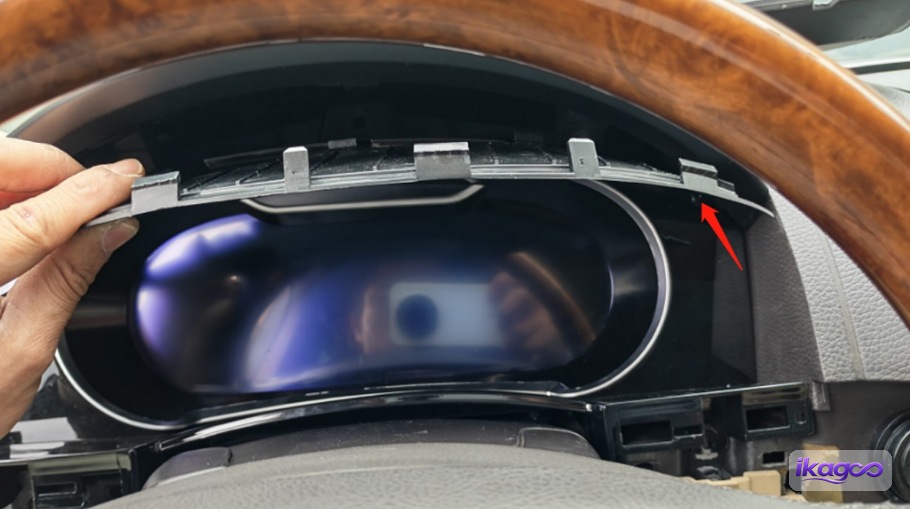
Montare la cornice del quadro strumenti LCD
Agganciare la nuova cornice del quadro strumenti in posizione attorno al display. Lavorare lungo il bordo e verificare che la cornice si posizioni uniformemente con l'apertura del cruscotto.
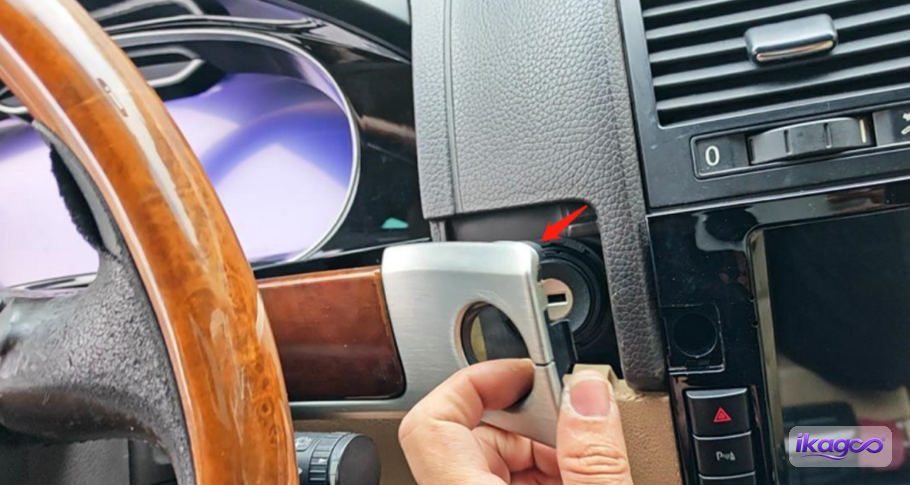
Rimontare il rivestimento laterale originale
Riposizionare gli elementi di rivestimento originali su entrambi i lati del quadro strumenti. Questo è il primo controllo visivo che il nuovo gruppo sia posizionato dove il cruscotto originale lo prevede.
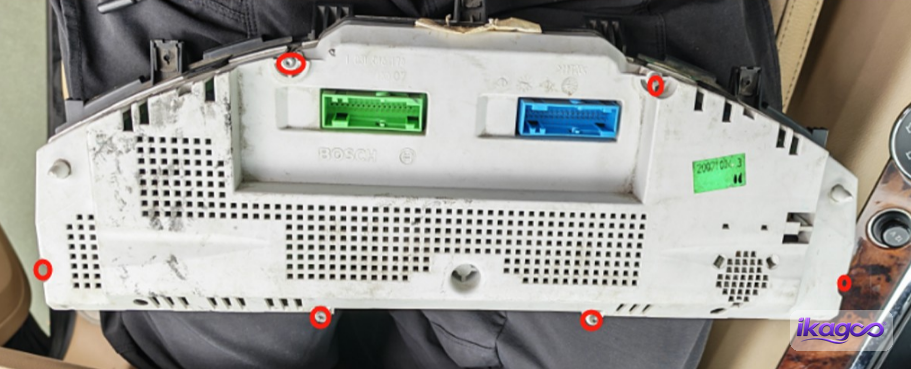
Perché il retrofit del quadro strumenti digitale VW Touareg 7L 2003–2010 mantiene la scheda madre originale?
Risposta diretta: Questa procedura documentata iKAGOO mantiene la scheda madre originale del quadro strumenti Touareg, invece di scartare l'intera elettronica del quadro strumenti di fabbrica. Le foto di origine mostrano il quadro strumenti originale aperto, la scheda rimossa e quindi fissata a un supporto metallico fornito.
Rimuovere la vite dal quadro strumenti originale
Il lavoro ora si sposta sul quadro strumenti originale stesso. Rimuovere la vite mostrata nella foto per poter aprire l'alloggiamento originale. Da questo punto in poi, il quadro strumenti originale viene smontato perché parte della sua elettronica rimarrà nel veicolo.
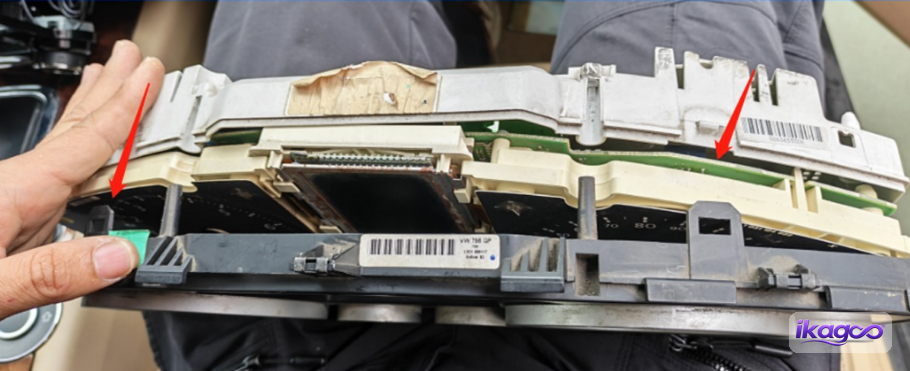
Apri l’alloggiamento originale del quadro strumenti
Separare con attenzione l'alloggiamento dello strumento originale. L'obiettivo non è semplicemente smontare il vecchio quadro strumenti; è raggiungere l'elettronica che il percorso di retrofit fotografato conserva e riposiziona.
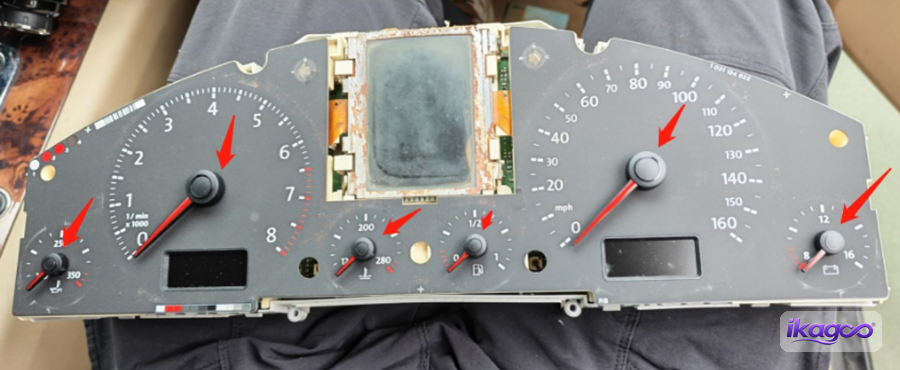
Rimuovere le lancette originali
Sollevare le lancette mostrate nella foto sorgente per poter aprire ulteriormente il quadro strumenti. Tenere insieme le parti originali rimosse mentre si completa la fase di trasferimento della scheda.
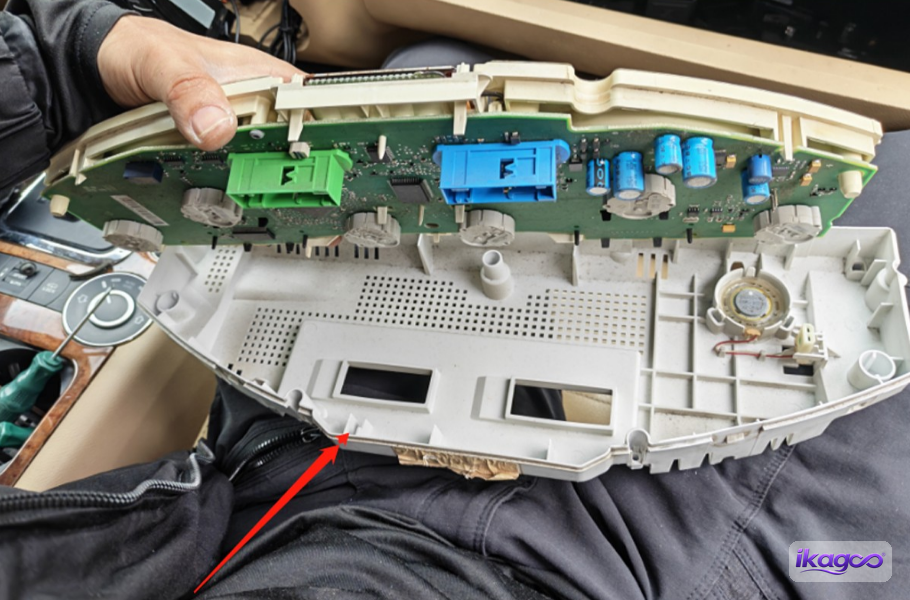
Sbloccare l'alloggiamento inferiore
Aprire l'alloggiamento inferiore mostrato nella foto. Questa operazione espone la connessione interna e la scheda madre originale dello strumento utilizzata nei passaggi successivi.
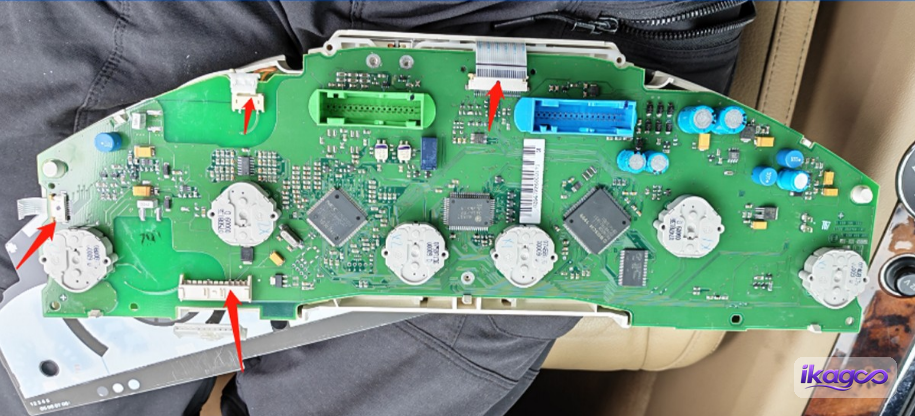
Scollegare il cavo interno del quadro strumenti
Staccare il cavo interno mostrato all'interno del quadro strumenti originale. Una volta rilasciato questo collegamento, la scheda madre può essere separata dall'alloggiamento originale.
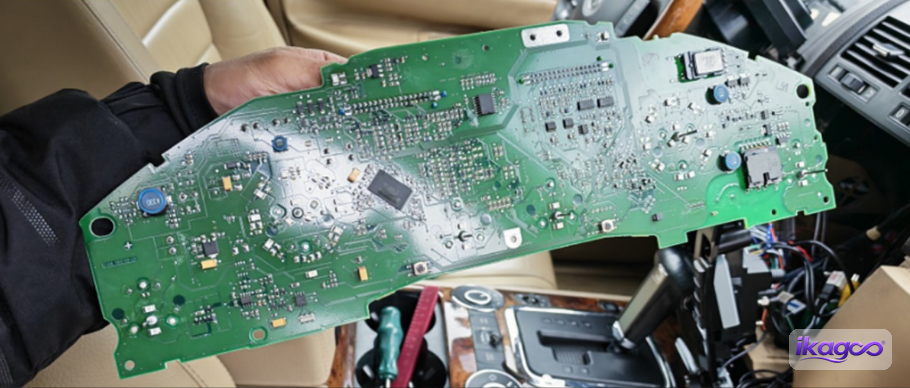
Conservare la scheda madre originale del quadro strumenti
Questo è il passaggio tecnico determinante in questa procedura di installazione: la scheda madre originale del quadro strumenti Touareg viene conservata. La sequenza sorgente non la scarta; la scheda prosegue nell'installazione finale.
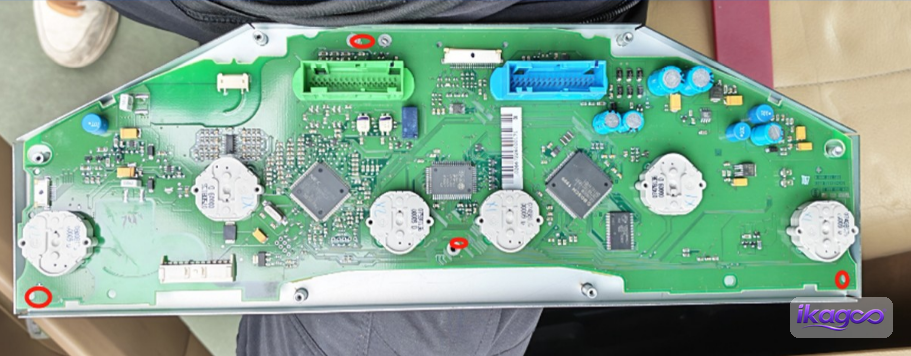
Montare la scheda madre conservata sul supporto metallico
Posizionare la scheda madre originale sul supporto metallico fornito esattamente come mostrato nella foto. Il supporto fornisce alla scheda un metodo di montaggio stabile dopo che questa esce dall'alloggiamento dello strumento originale.
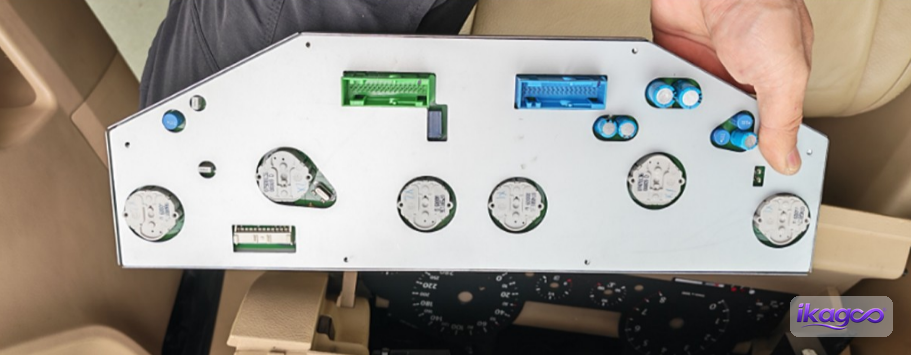
Verificare che la scheda madre originale sia fissata
Controllare il montaggio della scheda completato prima di spostarla sul lato passeggero. La scheda deve rimanere fissata al supporto con il suo punto di connessione disponibile per il cablaggio mostrato in seguito.
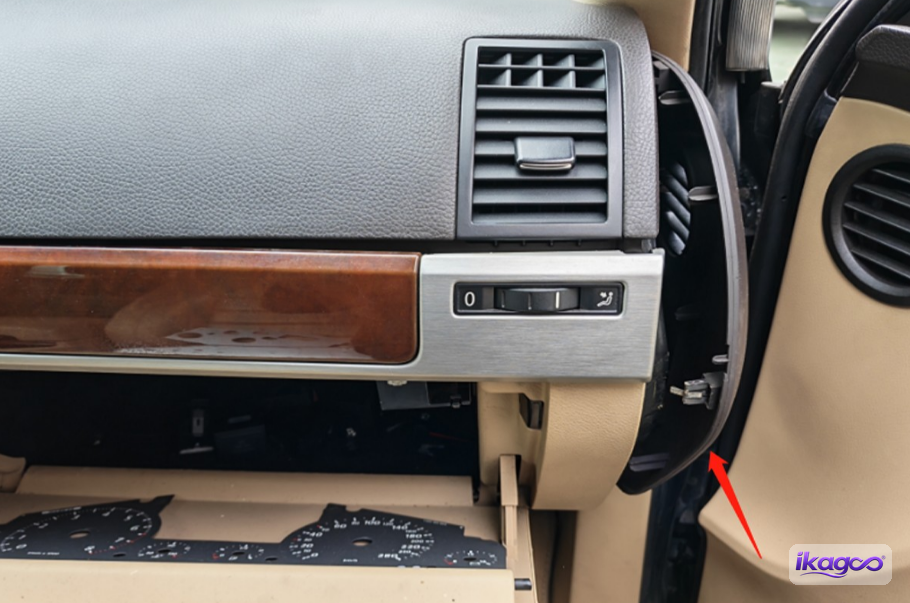
Dove va a finire la scheda madre originale del VW Touareg 7L 2003–2010 dopo il retrofit?
Risposta diretta: La scheda madre originale dello strumento conservata viene instradata verso la zona del vano portaoggetti lato passeggero. Il rivestimento del vano portaoggetti viene aperto, il cablaggio della scheda viene ricollegato e la scheda rimane fissata lì come parte del percorso finale del retrofit.
Aprire il pannello lato passeggero
Spostarsi sul lato passeggero e sganciare il pannello laterale accanto al vano portaoggetti. Questo dà inizio al percorso di accesso per il cavo di prolunga e la scheda madre originale conservata.
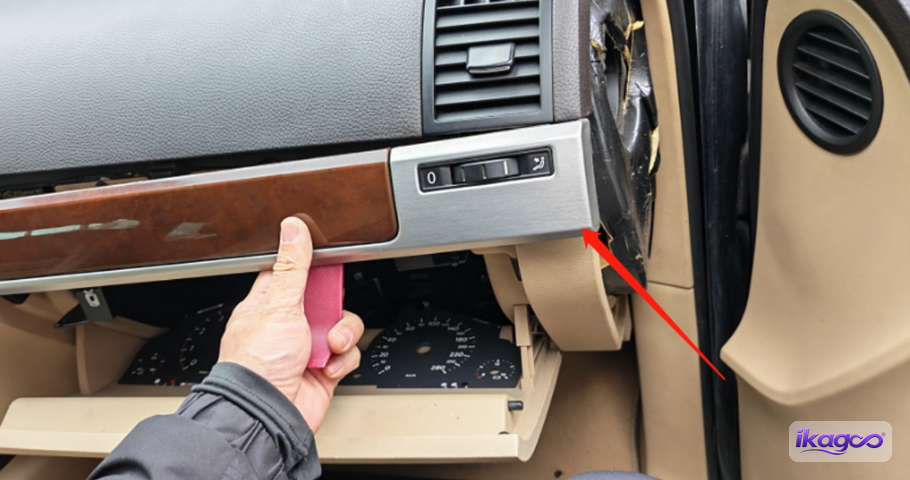
Sganciare il rivestimento lato vano portaoggetti
Rimuovere l'ulteriore pezzo di rivestimento mostrato intorno all'area del vano portaoggetti. Vengono aperti solo i pannelli necessari per raggiungere il vano di stoccaggio e la posizione della scheda.
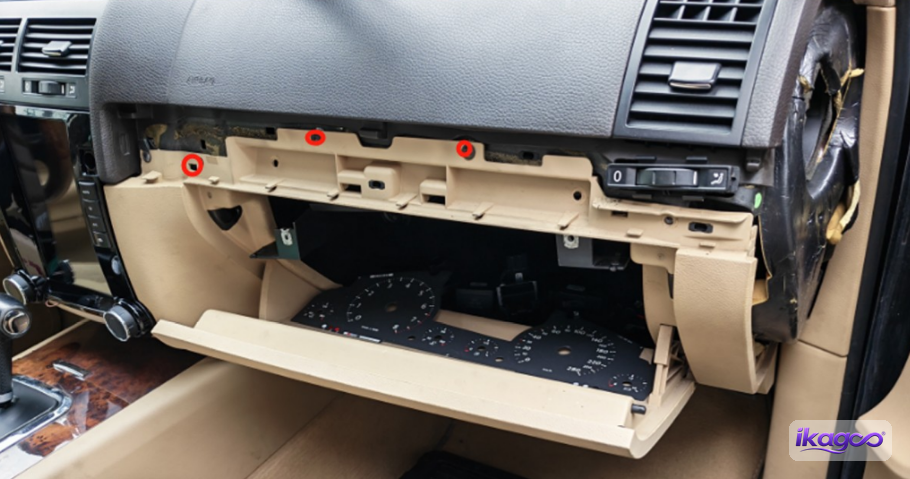
Rimuovere le viti del vano portaoggetti
Rimuovi le viti che fissano il vano portaoggetti/compartimento. Questo crea lo spazio di lavoro necessario per collegare e posizionare la scheda madre originale del quadro strumenti conservata.
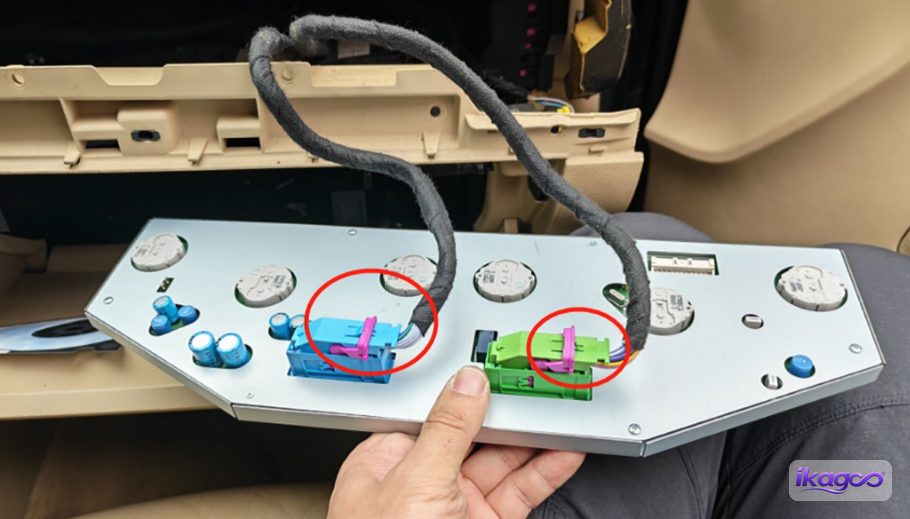
Ricollega la scheda madre originale conservata
Collega il cablaggio alla scheda madre originale conservata come mostrato. Questa connessione completa il percorso iniziato quando il cavo di prolunga è stato fatto passare dal nuovo quadro strumenti nel Passaggio 20.
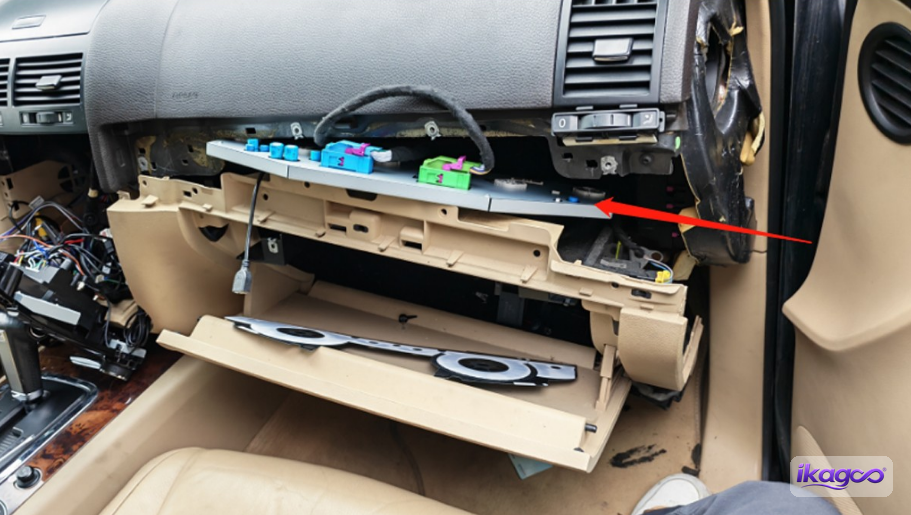
Posiziona la scheda madre conservata nell'area del vano portaoggetti
Posiziona la scheda madre originale conservata nell'area del vano portaoggetti lato passeggero seguendo la disposizione fotografata. Prima di chiudere il vano portaoggetti, assicurati che la scheda rimanga fissata al suo supporto e che il cablaggio abbia abbastanza spazio per rimanere collegato senza essere schiacciato.
Accendere e verificare l'installazione prima della chiusura finale
La fonte originale descrive il passaggio finale come il risultato dell'installazione completata, ma il set di passaggi estratto non contiene un'immagine separata del Passaggio 37. Prima dell'uso normale, accendere il veicolo e verificare le funzioni applicabili alla versione confermata del cluster.
Cosa bisogna testare dopo un'installazione del cluster digitale VW Touareg 7L 2003–2010?
Risposta diretta: prima di chiudere il cruscotto, verificare l'avvio stabile del cluster, le informazioni supportate di velocità/giri e del veicolo, le spie di avvertimento, la comunicazione del cluster, la connessione della scheda madre mantenuta e l'adattamento fisico delle finiture. Il comportamento specifico del prodotto CarPlay o la sincronizzazione della mappa devono essere verificati solo rispetto alla configurazione confermata.
Informazioni di guida
Controllare il display supportato di velocità e giri, i valori di carburante e temperatura, la posizione del cambio e lo stato delle porte per la configurazione corrispondente.
Avviso
Confermare che gli indicatori di avviso supportati appaiano normalmente e che non rimanga alcun guasto di comunicazione del cluster non spiegato.
Adattamento fisico
Controllare che il cluster e il rivestimento siano montati correttamente e che il cablaggio non venga compresso quando i pannelli vengono rimessi in posizione.
Funzioni di visualizzazione specifiche del prodotto
La visualizzazione della mappa di navigazione o CarPlay deve essere valutata solo in base al percorso funzionale confermato per la versione del prodotto acquistata.
Perché il supporto a lungo termine è importante per un cluster digitale VW Touareg 7L 2003–2010?
Risposta diretta: Il supporto a lungo termine è importante perché questo retrofit per Touareg combina un nuovo display digitale con uno specifico percorso del cablaggio e la scheda madre originale del quadro strumenti conservata. Se successivamente si presenta un problema, l'ordine originale, la versione hardware e il percorso del cablaggio possono essere necessari per identificare il software, il componente o il percorso di riparazione corretto.
L'attuale pagina del prodotto Touareg afferma che iKAGOO mantiene il supporto post-vendita a lungo termine collegato all'ordine originale per indicazioni sul software, supporto ricambi e coordinamento delle riparazioni, insieme a una garanzia hardware di 12 mesi. Questa distinzione è importante: la garanzia ha un periodo di copertura definito, mentre il valore di mantenere un archivio tracciabile del prodotto/supporto può continuare dopo l'installazione.
Questa è una delle ragioni per cui la decisione d'acquisto non dovrebbe basarsi solo sul prezzo più basso del primo giorno. Un quadro strumenti digitale può rimanere nel veicolo per anni; la capacità del venditore di identificare in seguito la variante fornita può ridurre il rischio di acquistare parti di ricambio incompatibili o di diagnosticare la versione sbagliata.
Questo aggiornamento del quadro strumenti digitale per VW Touareg 7L 2003–2010 è adatto alla mia auto?
Vale la pena un aggiornamento del quadro strumenti digitale su una VW Touareg 7L?
Le prove di installazione mostrano come viene eseguito l'aggiornamento, non che ogni proprietario ne abbia bisogno. Il caso più forte per l'aggiornamento è un proprietario che desidera davvero il cambiamento al cockpit digitale e ha intenzione di tenere il veicolo. Una percentuale specifica per Touareg non è inventata qui, mentre la metrica sottostante della pagina del prodotto è ancora in fase di correzione.
Questo quadro strumenti digitale iKAGOO si adatta alla mia VW Touareg 7L?
La compatibilità viene verificata in base alla forma del quadro originale, all'apertura del cruscotto, alla piattaforma/configurazione, alla posizione del volante e a eventuali modifiche precedenti. L'intervallo di anni è un ambito del prodotto, non un sostituto di tale verifica.
Posso installare io stesso questo quadro strumenti digitale VW Touareg 7L?
L3 · Fai-da-te avanzato. Il percorso rimuove il quadro strumenti e diverse sezioni della plancia, instrada un cavo di prolunga e mantiene/trasferisce una scheda elettronica originale. Questo va oltre una semplice installazione di un accessorio.
Quando dovrei interrompere l'installazione invece di continuare?
Fermati quando il connettore non corrisponde, l'apertura del quadro strumenti differisce sostanzialmente dal percorso documentato, la scheda originale richiesta non può essere mantenuta correttamente, o le informazioni di guida critiche finali non si comportano normalmente.
FAQ sull'installazione del quadro strumenti digitale VW Touareg 7L 2003–2010
Il quadro strumenti digitale VW Touareg 7L è plug-and-play?
Non nel senso di “staccare una spina e il lavoro è finito.” Questo percorso iKAGOO utilizza connettori abbinati, ma la vera installazione richiede anche la rimozione delle finiture e delle staffe del cruscotto, il montaggio del nuovo quadro strumenti, il passaggio di un cavo di prolunga e il mantenimento della scheda madre originale dello strumento. È meglio considerarlo un retrofit specifico del veicolo piuttosto che una semplice sostituzione di un accessorio.
Questo quadro strumenti digitale sarà compatibile con tutti i VW Touareg 7L 2003–2010?
Non si deve fare alcuna affermazione di compatibilità universale basandosi solo sull'anno. La forma originale del quadro strumenti, l'apertura del cruscotto, la disposizione per guida a sinistra o a destra, il mercato/configurazione e le eventuali modifiche precedenti a cruscotto o cablaggio dovrebbero essere verificati prima della spedizione. Se l'apertura nel passaggio 13 non corrisponde al percorso documentato, fermarsi prima di forzare il nuovo quadro strumenti in posizione.
L'installazione di un quadro strumenti digitale per VW Touareg 7L richiede codifica o VCDS?
La fonte fotografica iKAGOO utilizzata per questa guida non mostra un passaggio di codifica, quindi questo articolo non afferma che la codifica sia sempre richiesta o mai richiesta. I proprietari di Touareg chiedono spesso informazioni sulla codifica quando sostituiscono i quadri strumenti OEM, ma questo percorso aftermarket è diverso perché mantiene la scheda principale originale dello strumento. Confermare l'esatta configurazione fornita se la codifica o l'impostazione dei parametri è rilevante per il proprio veicolo.
Devo programmare l'immobilizzatore o riadattare le chiavi?
L'installazione documentata iKAGOO non mostra una procedura di adattamento delle chiavi o dell'immobilizzatore. Non applicare automaticamente le istruzioni per la sostituzione di un intero quadro strumenti OEM usato di Touareg a questo retrofit, perché il percorso fotografato mantiene la scheda principale originale dello strumento. Se il proprio veicolo o la versione fornita richiede un adattamento aggiuntivo, questo dovrebbe essere confermato prima dell'installazione.
Il mio chilometraggio originale rimarrà lo stesso dopo il retrofit del quadro strumenti digitale?
Le foto di installazione non dimostrano il comportamento di gestione del chilometraggio, quindi questa guida non promette un risultato universale. Poiché le domande sul chilometraggio sono comuni nelle sostituzioni dei quadri strumenti Touareg, chiedere a iKAGOO di confermare il percorso chilometraggio/display per la versione esatta fornita prima di ordinare se questo è per te fondamentale.
Perché questo cluster digitale Touareg mantiene la scheda madre originale del quadro strumenti?
Perché è il percorso effettivo mostrato nella fonte di installazione iKAGOO. I passaggi 24–31 aprono il cluster originale, ne conservano la scheda madre e la fissano a un supporto metallico. Non viene trattata come hardware da smaltire.
Dove viene collocata la scheda madre originale del quadro strumenti Touareg dopo l'installazione?
In questo percorso documentato, la scheda madre originale conservata viene ricollegata e posizionata nell'area del vano portaoggetti lato passeggero. I passaggi 32–36 mostrano l'apertura della finitura lato passeggero e del vano portaoggetti, il collegamento del cablaggio della scheda e la scheda che rimane in quell'area.
Velocità, giri motore, livello carburante e spie di avvertimento funzioneranno ancora?
Queste sono verifiche di accettazione fondamentali, non funzionalità da dare per scontate. Prima di chiudere completamente il cruscotto, verificare velocità/giri motore supportati, carburante/temperatura, informazioni su marcia o porte ove applicabile, indicatori di avvertimento e comunicazione del cluster per la configurazione veicolo abbinata. Se mancano informazioni critiche o rimane un nuovo avviso inspiegato, l'installazione non deve essere considerata completa.
Le mappe CarPlay appariranno sul cluster digitale Touareg?
Il prodotto Touareg iKAGOO viene venduto con un percorso di sincronizzazione mappe CarPlay, ma il percorso di visualizzazione esatto dipende dalla configurazione hardware/controller abbinata. Il funzionamento di CarPlay su un altro schermo del veicolo non prova di per sé che la navigazione apparirà nel cluster, quindi questa funzione deve essere confermata rispetto alla versione ordinata.
Posso installare da solo il cluster digitale VW Touareg 7L?
Gli installatori DIY esperti potrebbero riuscire a completarla, ma non è un lavoro da principianti di sola finitura. Il percorso reale apre il cluster originale, gestisce la scheda madre originale, instrada il cablaggio attraverso il cruscotto e ricolloca quella scheda nell'area del vano portaoggetti. iKAGOO classifica questo tipo di lavoro come Livello 3 DIY Avanzato; l'installazione professionale è la scelta più sicura se non hai mai lavorato su quadri strumenti.
Cosa devo controllare se il cluster è nero, si riavvia o mostra nuove spie di avvertimento?
Mantieni il cruscotto accessibile e documenta prima il sintomo. Controlla il connettore principale del cluster, il connettore sottile, il percorso del cavo di prolunga e il collegamento della scheda madre conservata confrontandoli con le foto di installazione. Invia a iKAGOO il numero d'ordine, i dettagli del veicolo, le foto dei connettori e un breve video del guasto prima di cambiare parti non correlate o forzare un'altra configurazione.
Dove posso acquistare questo cluster digitale VW Touareg 7L 2003–2010?
Risposta diretta: lo stesso cluster digitale VW Touareg 7L 2003–2010 iKAGOO è disponibile nella pagina prodotto collegata. Se la forma del cluster originale, la posizione dello sterzo, l'apertura del cruscotto o il percorso CarPlay/mappa richiesto non sono già stati confermati, invia le foto del veicolo per la verifica di compatibilità prima di ordinare.










Add comment